_(6).jpg&h=630&w=1120&c=1&s=1)
In summary
- Just 10 minutes of yoga a day can improve mobility and ease stiffness, according to certified yoga therapist Brandt Passalacqua.
- Practising regularly matters more than mastering complex poses, since consistency delivers the biggest benefits over time.
- Thirteen poses, from Downward Dog to Half Lord of the Fishes, target strength, flexibility and balance when held for 5–10 breaths each.
If you're feeling a little stiffer when you climb out of bed these days or your lower back aches no matter how much you stretch or rest it, it's time to take charge of your mobility.
As we age, our muscles naturally lose strength, flexibility and mass, which can cause joint pain and affect how well we move over time. And that can make it tough to stay active and independent as you get older.
Luckily, there's one secret to healthy ageing that you can easily add to your daily routine: 10 minutes of yoga.
Yoga is one of your biggest allies when it comes to building strength and flexibility because it combines resistance (via your body weight) and balance work. It also boosts circulation and offers a low-impact workout, making it useful for people with mobility or pain issues. The key is to make your yoga flow a part of your regular routine, as there are big benefits to doing yoga every day.
"With yoga, practising regularly is more important than doing complex poses," says Brandt Passalacqua, a certified yoga therapist and instructor. "Just 10 minutes of stretching a day can improve your mobility and really benefit your health," Brandt says.
Ready to loosen up? Add these yoga moves to your daily routine to help ease stiffness and pain.
Best Yoga Stretches for Stiffness and Pain
The poses below are some of the most common positions you'll find in yoga flows – a great place to start. Remember to inhale and exhale through each move, and add some extra mindfulness by intentionally focusing on how your muscles and body feel with each movement and breath.
Hold Time for Each Position: 5–10 breaths
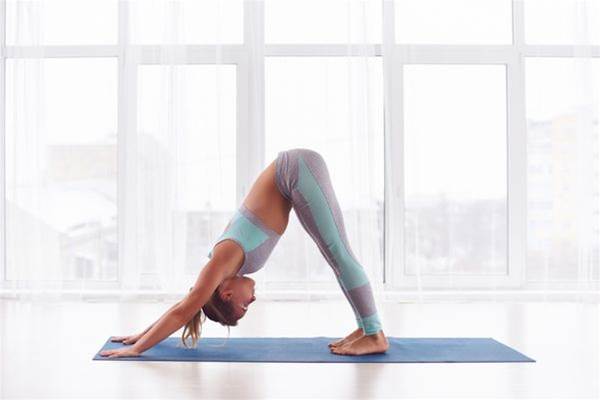
1. Downward Dog
Why it works
This pose opens up your shoulders, hamstrings and calves, as well as the arches of your feet. Down dogs also help to strengthen your shoulders and upper back. And by bending so that your heart is over your head, you'll increase blood flow to the brain.
How to do it
- Start in a tabletop position with your hands beneath your shoulders and your knees beneath your hips. Inhale.
- Exhale and lift your knees off the floor, positioning your hips towards the ceiling.
- Reach your heels to the floor and straighten out your knees as much as you can without locking them up.
- Press through your fingertips and keep your head between your arms as you gaze between your calves.
- Hold.
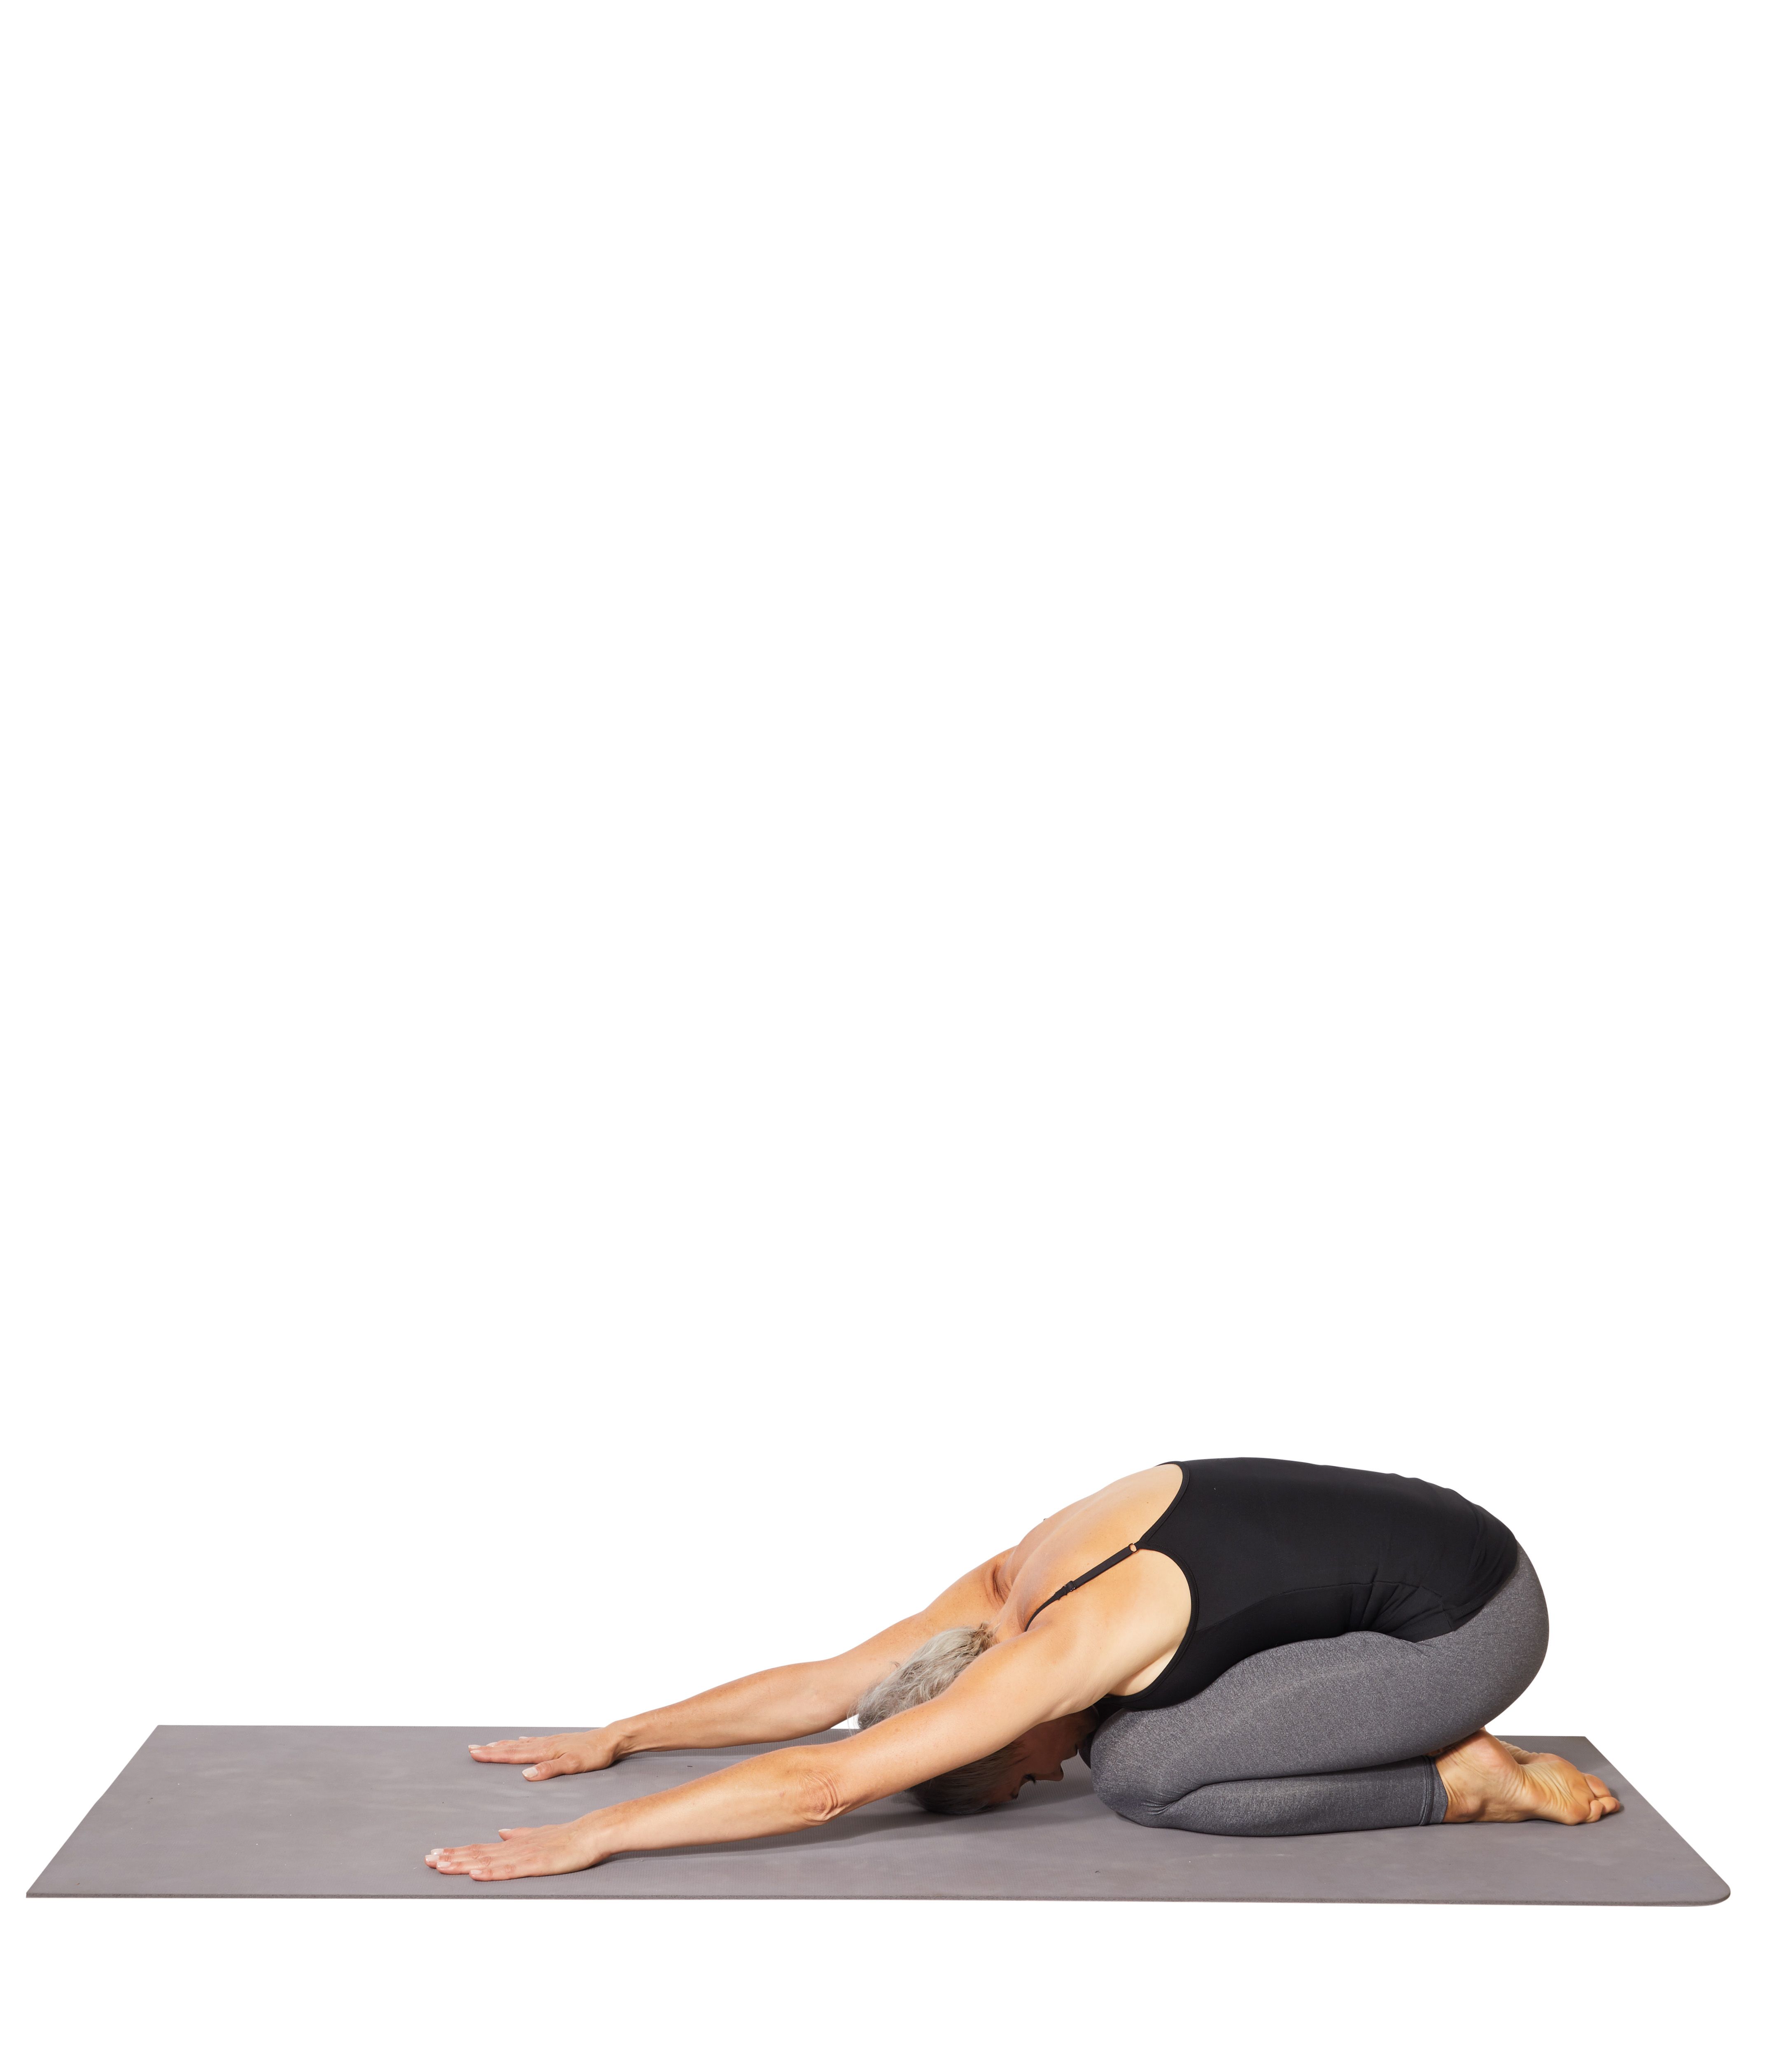
2. Child’s Pose
Why it works
This restorative yoga pose is a great shoulder opener and provides a restful moment between more difficult positions. You want to feel like you're reaching your hips and hands towards the opposite end of the room for maximum benefits.
How to do it
- Start in a tabletop position.
- Touch big toes together.
- Then sit back on heels and put torso on thighs.
- Reach arms straight in front of you with palms facing the floor.
- Hold.
3. Warrior I
Why it works
If you want flexible hips and strong legs, lunge positions are for you. Warrior I is especially good for opening the front of your hip flexors, as well as your shoulders.
How to do it
- Stand up straight.
- Step back into a lunge as you raise your arms overhead. Slightly tuck your tailbone and try not to overarch your back.
- Hold.
- Repeat on the other side.
4. Triangle Pose
Why it works
This standing pose stretches your hips, hamstrings, calves, chest, shoulders and spine. It's also great for strengthening your knees, quads and ankles.
How to do it
- Stand with your feet about a metre apart.
- Turn your right toes fully to the right side and angle your left foot slightly inwards. Extend your arms out to the sides at shoulder height.
- Keeping both legs straight without locking your knees, reach your right hand towards your right side, over your toes, then hinge at your right hip and lower your hand to your shin or ankle.
- Reach your left arm towards the ceiling and gently rotate your chest open. Keep your spine long and gaze forward or up towards your top hand.
- Hold.
- Repeat on the other side.
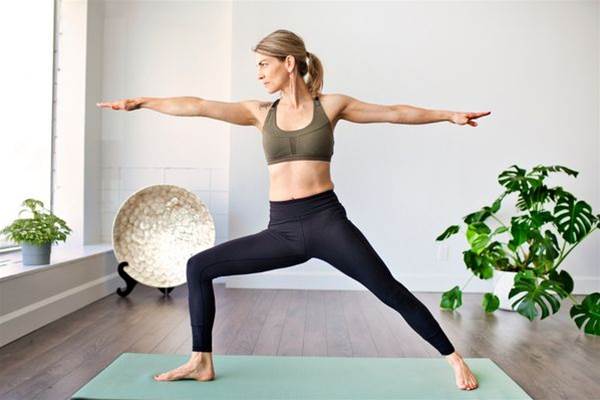
5. Warrior II
Why it works
This pose is known for increasing strength and stamina, particularly in your legs and arms.
How to do it
- Stand with your feet about a metre apart. Lift your arms until they're parallel to the floor, palms facing the floor.
- Turn your right foot to face the front of the mat and angle your left foot 45 degrees inwards.
- Bend your right knee until it's directly over your right ankle. Check to see that your right ankle is in line with the arch of your back foot.
- Try to get your right thigh as parallel to the floor as possible.
- Hold your gaze over your right hand.
- Step back and repeat on the other side.
6. Mountain Pose

Why it works
Doing mountain pose might feel at first like you're just standing. But, when performed intentionally, it's a great way to rest between poses and improve your posture.
How to do it
- Stand tall with your feet together or about hip-width apart, whichever feels more comfortable.
- Press evenly through all four corners of your feet and keep your knees soft rather than locked. Engage your core, lengthen your spine and gently draw your shoulders down and back.
- Let your arms rest alongside your body with your palms facing forward. Keep your chin level and gaze straight ahead.
- Hold for several slow, steady breaths.
7. Cat-Cow
Why it works
Cat-cow warms up your spine. The two poses are great to prep for more difficult backbends and to release stress, especially after getting out of bed or sitting at a desk.
How to do it
- Start in the tabletop position with your hands beneath your shoulders, your knees beneath your hips and your spine neutral.
- Exhale and enter cat: Round your spine to the ceiling and gently release your head towards the floor, tucking your chin to your chest and drawing your belly button up.
- Inhale and enter cow: Lift your chest, head and hips to the ceiling, being careful not to overstrain your neck.
- Instead of holding each pose for five to 10 breaths, alternate between these two positions five to 10 times, moving with your inhales and exhales.
.
8. Bridge
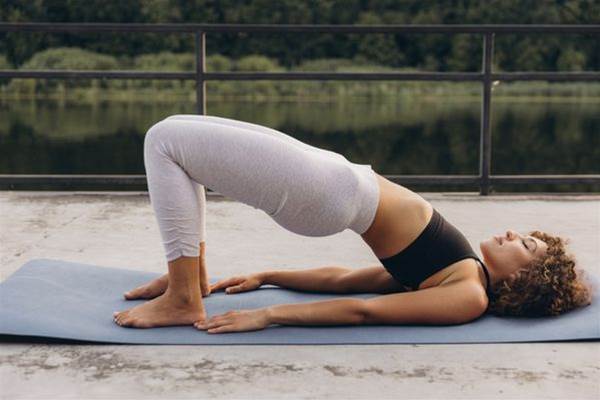
Why it works
Bridges are effective glute strengtheners and a great way to open up your shoulders and hips.
How to do it
- Lie face up with your feet on the ground, hip-width apart, and your knees pointed towards the ceiling. Bring your heels as close to your hips as possible. Inhale.
- Exhale and squeeze your glutes to lift your hips off the floor. Keep your knees over your ankles.
- Clasp your hands beneath you and stay on the tops of your shoulders. Pinch your shoulder blades together and hold as you press your little fingers into the ground.
9. Warrior III
Why it works
This warrior pose is especially good for working on balance and coordination. It also strengthens your ankles, legs and upper back.
How to do it
- Stand with your feet hip-width apart. Inhale to shift your weight to your left leg.
- Exhale and hinge at your hips, sending your hips back, keeping your back flat and lifting your right leg behind you. Actively press through your right heel.
- As you feel comfortable, raise your arms in front of you until they're in alignment with your torso and right leg. This will strengthen your upper back.
- Hold.
- Repeat on the other side.
10. Seated Forward Fold
Why it works
Forward folds promote flexibility in your back, spine and hamstrings.
How to do it
- Sit on your mat with your legs straight in front of you. Keep your hands on the ground by your hips as you actively press your heels forward and sink your thighs into the floor. Take a deep inhale.
- As you exhale, lean forward from your hip joints. If you can, grab your big toes or the outsides of your feet. You may also start with your knees bent, and then slowly straighten them once you relax into the posture. Never force your body to go too far.
- Hold
11. Tree Pose

Why it works
This position stretches your groin, thighs, torso and shoulders. Because you're standing on one leg, it also challenges your balance.
How to do it
- Begin standing on your mat with your arms by your sides.
- Shift your weight onto your right foot and lift your left foot off the ground. Place your left foot against your calf, ankle or inner right thigh. Avoid placing it directly on your knee.
- Stare at an unmoving point in front of you and bring your arms to a prayer position at the centre of your chest. Depending on how flexible you are, you might be able to get to this position without grabbing your foot.
- Raise your arms overhead if you want an extra balance challenge.
- Hold.
- Repeat on the other side
12. Pigeon Pose
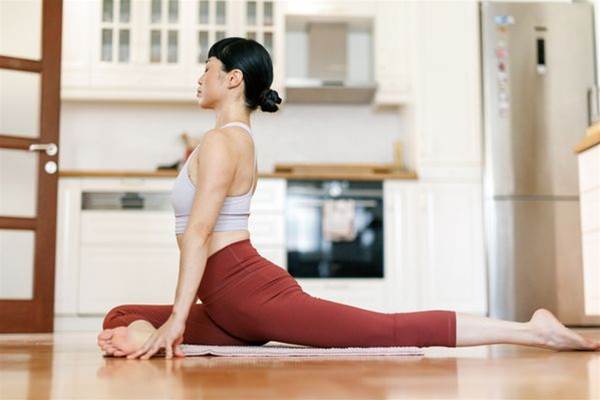
Why it works
Pigeon pose is excellent for increasing hip mobility, making it a particularly good stretch if you sit for long periods of time.
How to do it
- Start in the downward dog position. Lift your right leg back behind you, then bring your right knee towards your right wrist (or as far as you can).
- Rotate your right foot towards your left arm. Rest your right leg on the ground with your shin either perpendicular to the front of the mat (making a 90-degree angle) or pointed more towards your groin (more of a 45-degree angle). Adjust to make sure you're not putting too much pressure on your right knee. Keep your hands on the ground by your sides or reach ahead of the shin that's on the ground.
- To increase the intensity, extend your left leg straight behind you.
- Gently return to the downward dog position and repeat on the other side.
13. Half Lord of the Fishes

Why it works
This regal-sounding pose will have you standing taller and feeling more energised. It's great for aligning your spine and stretching your shoulders, hips and neck.
How to do it
- Sit on your mat with your legs straight in front of you.
- Bend your left knee and place your left foot next to your right knee.
- Inhale. Then, as you exhale, twist your torso to the inside of your left thigh. Place your left hand behind your sit bones for support.
- Place your right arm on the outside of your right leg, just below the knee.
- Continue to twist your torso to your left thigh as you press your left thigh into your torso. Look over your left shoulder.
- As you breathe, lift your sternum and stay tall in your torso. Try to twist a little bit more every time you exhale.
- Optional: Bend your right knee and tuck your shin under your left knee to deepen the stretch.
- Repeat on the other side.

 Newsletter
_(2).png&h=90&w=90&c=1&s=1)


_(2).png&h=193&w=250&c=1&s=1)
.jpg&h=193&w=250&c=1&s=1)